


Have you ever wondered how other people get such perfect shots of their products?
The ones where the product appears to be floating off the page?
With a seamless white background? Yeah, that one.
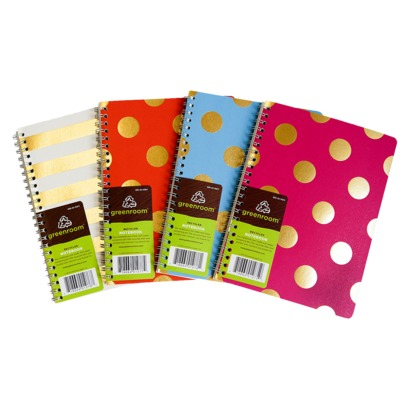
You see these photos on top brands like Paper Source, Burt’s Bees, ModCloth, Nordstrom and more.
I’m going to show you how you can take your own product photos on a white background in this super easy and affordable set up!
Why white product photos?
But first, why is it the industry standard to have product photos on white?
- Firstly, they present your products with the least distractions.
Online shopping is completely normal these days, but for a lot of us, we want to know what we’re getting in the mail.
It’s your responsibility as the seller to represent your products with accurate photos of them.
- Secondly, they’re media friendly, which means you’re more likely to be featured in a popular blog or magazine.
As an editor of a blog or magazine, part of their job is seeking for cool products to feature.
Editors always want white background product photos so they can easily include your item on their magazine or website, without doing tons of editing.
- Thirdly, they give your shop a more consistent look.
This makes customers feel that you’re professional and increases trust in shopping with you.
I have critiqued dozens of Etsy shops and the number 1 reason for lack of sales is the poor quality of photos.
Don’t make that mistake. Re-photograph your products if you need to. It’ll be worth it!
What you need and where to get them
-
- Lightbox
- A lightbox is made with white see-through material to allow for light to shine through, but softens direct light for minimal shadows (yay!)
- get them for cheap on Ebay ~$15-20
- or make your own with a cardboard box and white fabric (downside is it’s not collapsible, but does the trick!)
- Clamp lights
- home improvement store like Home Depot, Lowes or Menards ~$10 each
- get three clamp lights
- 100 watt daylight light bulbs
- home improvement store or Target ~$7 each
- get three, one for each light
- Camera that allows you to configure settings
- A tripod is optional
- Place for you to set up and clamp on lights
- Photo editing software
- Lightbox
Misconceptions about photographing your products on white
I also want to mention a few misconceptions on this process of taking product shots on white background.
- You don’t need a fancy, expensive DSLR camera to take great photos. I can take perfect product photos using just my iPhone 5!
- You don’t need sunlight at all. You can literally snap your photos in a dark room.
- You will need to edit your photos using photo editing software – so don’t expect them to look perfect from the get go.
- You won’t need to buy Photoshop for your photo editing software, there are great free ones you can use!
How to set up your equipment
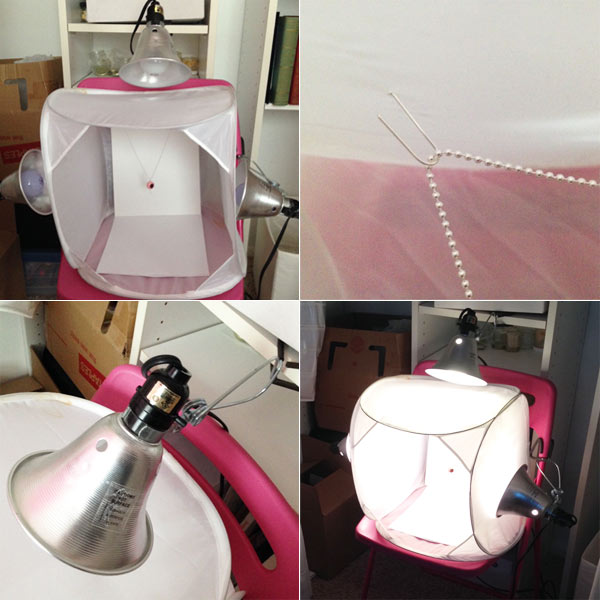
Here are some photos of how I set up my cheap (and totally not classy) lightbox.
It will be tricky to find a spot to clamp on the lights, but consider dragging over chairs, furniture or storage bins (with stuff inside for the weight).
From the photo above, the left and right lamps are clamped on to the pink chair. The top light is clamped on to the closet shelf fixture.
A few rules to ensure your photos turn out perfect:
- Use three lamps, one on top, left and right for the best light
- Insert a piece of white paper or cardstock behind your product
- Turn off all other light sources in the room (including sun light) so that the lighting in your picture is consistent
- When you are starting out, snap more photos than you think you’ll need.
- Don’t use flash!
Jewelry hack: To hang necklaces in the lightbox, I poke through two headpins and curve them into hooks for hanging the necklace! (See photo above.)
Camera settings- ISO, white balance, F-stop,
Now that you have everything set up, you’re ready to start snapping some photos like the paparazzi!
We need to configure your camera so that it takes the best shots of your product.
Don’t be scared of this step, I’ll help boil down the technical stuff down to easy-to-understand concepts!
ISO, aperture and shutter speed are three settings that are just different ways that control the brightness of your photos.
- ISO: the higher the number, the brighter the photo but the lower the photo quality (you’ll get lots of grains called “noise”)
- ISO examples: 200, 400, 600, 800
- Aperture: the lower the number, the brighter the photo but the less out of focus your product is
- Aperture examples: f/2, f/2.8, f/5.6, f/8
- Shutter speed: the smaller the number under “1”, the brighter the photo but the more sensitive your camera is to hand movement causing blurry photos (if not using a tripod)
- Shutter speed examples: 1/250, 1/60, 1/30, 1/5
White balance is the fourth setting you need to know.
It sets the white hue of your photos. Setting the wrong white balance can make your photo look too blue or orange. We want it just right!
White balance settings are not always the same from camera to camera.
I recommend you take one photo using each of the different white balance options.
This way you can look at which photo turned out the best – and memorize that!
Consult your camera’s manual to check how you can configure these four settings.
Practice, practice, practice.
The first few times, you’ll feel confused and slow at taking photos.
Once you find that perfect configuration, write it down or memorize it (just make sure your set up is always the same, or your settings may change).
Voila, the unedited photo straight out of the camera
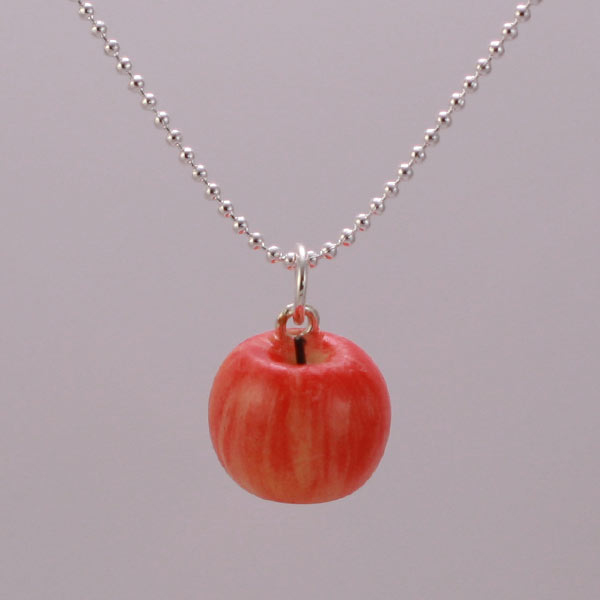
Something I didn’t understand when I was first starting out, was I kept getting grey photos like this.
I could never achieve the flawless white background straight out of the camera.
As I mentioned earlier, you will need to edit your photos later. There’s no way around it!
This apple necklace photo is how your photo should look as well.
In a follow up post, I’ll show you exactly how to edit your photo to get that white background and in under ONE minute.
Questions, comments, concerns?
Leave me a comment if you have any resources or tips to share!
And if you have questions or comments, be sure to let me know too so I can help.


Unlock a Profitable Handmade Business
in Just 12 Weeks Without Using Etsy
or Social Media


FREE WORKSHOP
This workshop is for anyone who makes and sells a handmade or physical product, including jewelry designers, artists, paper designers, bath & body product makers and more!
What You'll Discover
The #1 mistake people make with Etsy & social media that causes shops to FLOP
The secret to making it with your handmade shop so it's no longer just a hobby
How to make sales in your handmade shop with ease so you can finally get to 6-figures
TAKE ME THERE


Your email address will not be published. Required fields are marked *


fantastic… thankyou thankyou thankyou xoxo
You’re most welcome, Kylie! Good luck with your own photos! Don’t forget to watch the follow-up video on how to edit your photos too:
https://www.creativehiveco.com/how-to-edit-product-photos-for-a-white-background-in-one-minute/
Thank you so much Mei! I’m having great fun today getting myself set up and practising hard! I want to revolutionize the photos in my Etsy shop BlackSquirrelHome. I sell vintage homewares and upcycled pieces. I’ve long wanted to get to grips with getting a consistent background and having really professional looking pics. I think the way you’ve explained everything is unbelievably simple and so helpful. You’re so generous to share your expertise in this way :) Wish me luck for my shop revamp!! :) Thanks so much again :) Ally
Great article! White background photography is so essential for clean, professional product presentations, especially in e-commerce. I appreciate your tips on lighting and the importance of avoiding harsh shadows—small details make such a big difference. As someone who works in photo retouching, I’ve seen firsthand how a simple white background can elevate a product image. Thanks for sharing these insights!
What if you are photographing clothing items? Any tips for a set up? Thanks.
I am also looking for tips on photographing clothing. Any ideas that could be provided would be most appreciated. Thank you!
Dianna and Amy,
With apparel photography, the same set up applies, except instead of a tiny lightbox you want to use the same concept at a much larger scale.
Here’s what this can look like: http://www.removethebackground.com/wp-content/uploads/sites/28/2014/06/2Apparel-lighting_-1-mono-light-setup-908×425.png
It would be a good idea to photograph on both a mannequin and on a model too!
This lighting kit would be a good fit if you’re looking for a more affordable set up. It’s similar to the one I use for my video set up:
http://www.amazon.com/LimoStudio-Photography-Portrait-Umbrella-Continuous-Lighting/dp/B005FHZ2SI/ref=sr_1_1?ie=UTF8&qid=1423722111&sr=8-1&keywords=studio+lighting
Love the simpleness of the set up and fabulous result.
For ceramics, especially homeware, do I need some life shots to show how fantastic it can be used and to encourage customs imaginations of a life style or function of the product?
Thank you! Yes, those life shots are important for any and every product, no matter what you sell.
Hi Mei – I design and make quilts for babie, toddlers & young children. My biggest, biggest problem and the one that gives me nightmares is the photographs. How do I photograph them??????
Just checked out your website, Stephanie, and it looks like you’ve photographed your quilts very well! The only thing I would edit on your photos is the white balance. They are currently looking very yellow! But they are good photos, nonetheless :)
I”m seeing full 24″ lightbox kits on eBay for around $40 – they come with light stands, daylight compact fluorescent bulbs, and mini tripods for either phone or DSLR…Just wondering – do you think the clamp light set up is preferable? These kits seem like a cheap & easy way to go
http://www.ebay.com/itm/24-Photo-Studio-Photography-Tent-Softbox-Lighting-Kit-with-Light-Tripod/
I have to say that I bought one of these light boxes, and the light is so blue…I have spent hours trying to edit my candle photos – and actually if I just would have put out a white tagboard and used natural light, I think they would have turned out better?! (I think they are “okay” – not great…) https://glad.is/collections/scented-candles
Hello, Mei!
Thank you so much for sharing!
I would like to hear your recommendations regarding photos of home decor, night lamps in particular.
Thank you in advance!
Thank you, I needed this. My pictures on my site are pitiful.
I make wind chimes, lamps & chandeliers. I can usually photograph the lamps without too much trouble, but when it comes to the wind chimes & chandeliers – I have a really hard time. Mostly due to their size. Any suggestions? I need to hang them so providing a plain background is difficult.
Hello,
all my photos are excellent but I still fail to increase sales. :(
https://www.etsy.com/shop/SerZiHandicrafts?ref=pr_shop_more
Zivile
Hey Zivile! What have you been doing to market your shop? Having great photos and great products doesn’t mean anything if you’re not getting targeted traffic to your site.
Mei:
This works great for jewelry items. But what about bigger items that are are 10 to 12 inches tall? How would you set up the lighting for those?
Hey Uta, same concept applies. Just need a bigger lightbox or create your own.
Thanks Mei. =) I have about 3 different sizes of lights with some sort of fabric in front for the light box effect but I either don’t put them in the right spot or they are not big enough. I guess I need to keep trying. =)
It sounds like you’ve got the right things. Placement of lighting should be the same. Check your camera settings and be sure you’re editing your photos afterwards :)
I sell makeup bags, any suggestions as to how to set them up for a White background
Its always a better choice to take a product shot in white background but if that shot is not perfect enough then Photoshop can help. Yes its so easy to remove background from any image in Photoshop and after removing the existing background it is just needed to place it in whichever background you want.
Thank you, you! make things sound simple and so easy to understand
You are a good and generous person Mei…I am using your input to improve…thanks Charlie
How do I set up a white background for a crib or my larger items like ponchos? If I had white walls, this wouldn’t be an issue at all, but my whole house is blue, grey, or sand colored.
Hi Mui
Thank you for your advise. I have just ordered a light box and tripod with remote shutter (to alleviate camera shake) for a LOT less than expected. All light boxes I looked at have built in LED lights, so I ordered one ot these. I do have a couple of questions though…
Firstly, do you have an opinion on the built in lights and will I still need alternate lighting?
And, as I’m using a Samsung s6 edge to take photos (can’t afford new camera) I can’t figure out how to change all the settings separately as you suggest, just has presets. Can you advise, or know someone that can, what settings I should be using.
Oh sorry, one final question, you state we should use a white background, which the light box has, but it also includes a black one. My products are often white cards, so I’m wondering if black would be better for these to avoid blending into background. What do you think?
Thanks for your time, I’m doing your 30day challenge and so far it’s proving very helpful.
Liza
I did the whole white background thing and while the photos looked great, I didn’t like the cold look. I started using backgrounds and props and I’ve gotten a MUCH bigger response from everyone. There is noticeably increased interest in my product now and business has picked up tremendously.
This is very helpful as I’m trying to revamp my product blog! Thanks http://www.kendrareviews.com
Thanks so much for your help.
One question. I am photographing bottles. their is a shadow on the bottom where the bottle meets the bottom of the white screen in the box. When I use the trick you demostrated to create a while background the shaddow from the bottle creates is still there . Is their a trick to get rid of that grey shaddow
Hi one more question is their a way to focus in on a specific area to clean that area up so it is white.
I find that large areas of the background is white but an area is still a bit grey so I would like to lighten that area further so it is white also
This is very helpful. hope you will share more.
This helped so much! Thank you!
I didnt get the results i wanted.
My item is a table lamp and the shade is white. the tool removed the shade as well….
Hi,
Every think is working properly as you have described in you video one and only problem is unable to save the edited pics in Jpg mode kindly suggest what to do.
Regards
Your reply awaiting
Nice to read your article. There is no doubt that white background can present the products with least distractions. Apart from white background I would like to say some background color those can also infuse brand identity into the shots and help to drive more sales. Those are:
1. Neutrals
2. Black backgrounds
3. Solid colors
4. Patterns
5. Wood backgrounds
6. Tiles
7. Bokeh
8. Textures
9. Contextual backgrounds
I can’t believe how easy this is! I’ve struggled with my photos for the longest.
Thank you so very much!
thank you, thank you, thank you, and thank sooooooooooooooo much. I would give you a big hug if you were in front of me right now!!! you made everything soooooooooooo simple to understand. actually far more simple than all the freaking youtube vids out there. omg thanks again. really appreciate you writing this
Thank you so much for this best idea that you have described here perfectly.
Gimp does not work for apple. Do you have anothe app suggestion?
Thanks Bennur
Product photography is the most important to grow your product selling. It depends on how you captured and edit your photos exactly. It would be much better if you add the shadow on your product with a white background.
I appreciate your product photography tips.
This is what i was looking for my products. Thank you so much.
I’m amazed, I have to admit. Rarely do I come across a blog that’s equally educative and entertaining,
and without a doubt, you have hit the nail on the head. The issue is something which too few people are
speaking intelligently about. I’m very happy I found this
during my search for something concerning this.
Hi, great quick and dirty way to whiten product photo backgrounds.
I must say however, that I don’t think your pictures are properly white balanced to begin with, which you *should* do with your camera prior to taking your pictures. What you did in photoshop with the eye dropper wasn’t as much whitening your background as it was color balancing your photo using the background as a reference point. What that does it alter the color of your product as well which won’t always produce the desired result. Your background wasn’t just a light grey but had definite purplish tones.
I sell decorated cookies. Some of my cookies in my bridal line are white, or in my Halloween line, such as the ghosts.
How would I photograph them on a white background. I don’t think they would show up. What would the alternative be. Thank you so much for you post. It is extremely helpful to me as it answered all my questions except the one above.
I was told by someone on Facebook that my backgrounds should be colorful, using many colors to make my website cheerful. So that’s what I did. I was also told to embellish my photos with things like beads, sparkly stuff, food etc. My sales have not been good. Could that be the reason why? Maybe my customers think my website looks too busy. I just don’t know. Please advise. Thank you.
Hey?? Thanks! You said you use your iPhone 5. For jewelry shoots. I can’t change aperture iso in my iPhone 6. So I’d be curious about what photo app you use to get the image white???
Thanx!
I’d get a white sheet or some white boards, or go the long way round using fotofuz, or photoshop, you can remove any background you have and replace it with white. it’s time consuming though so depends on how many products you have to photo. x x x
Amazing post, thank you very much
very misleading. that picture is not a white background. not even sure what the color is.
Great important post, where you make the main focus, really makes me happy for its necessary of importance. After all it is a great article with everything. Thanks in advance for posting it.
Great post! I like that this article covers a lot of useful details which are not available everywhere.
He recently said: “Virgil is very committed us for a long time and we dont see anything but that in our future.
Hi I take my photos in a light box, and over expose them
To get the white background. Sometimes I get a grey/blue
corner or edge to the photos.. why is that
Website – http://www.collected.ie
Thank you!
Elva
Enjoyed this Article very much, thanks for sharing!
Thank you for sharing with us this great information. I learned a lot from what you shared to create beautiful photos
Thank you for sharing the great post regarding perfect product photography on a white background. You have covered almost every necessary point such as light effect, camera setting, white balance setting, etc. It is very useful for me as I am planning to shoot my product images. Thanks for your great help.
This helped so much! Thank you!
Awesome post!
A product is more gorgeous for it’s background. Very helpful post.
Thank you for your post. I have read through some similar topics! However, your article gave me a very special impression, unlike other articles. I hope you continue to have valuable posts like this or more to share with everyone!
The advantage of selecting one background color means that store consistency; white offers the foremost continuity as way as creating totally different color and magnificence product look nice. Plus, if you would like to indicate your product with the smallest {amount} amount of distractions, white backgrounds ar the simplest thanks to do that
Thank you for the post. It saves my days!
I really enjoy looking at on this web site, it contains wonderful content.
Thanks!!
I take product shots of small items with fine detail and a variety of colors. (Items are roughly 1-inch by 1-inch). I have two lights which I position at angles from the front to get lots of light on the items. (These lights allow me to change the brightness and color temperature — generally I find 5000K is the best temperature on full brightness).
The only issue I am finding though, is that this amount of light is sort of bleaching out the colors and the black areas are appearing quite grey.
I find if I pull the lights back a bit, or adjust settings to let in less light in, then my image is too dark, and the details are not being captured correctly.
Do you have any ideas for what I can do to try to capture a nice dark/vivid black from my items, while still having ample light on the items?
Great info that you have shared here with details, thanks
https://clippingmaskphotoshop.com/fashion-photography-editing/
many thanks a good deal this amazing site can be conventional in addition to relaxed.
fantastic tip, just tried it and it worked great for me! Thank you!
I love this post!! Such simple ideas.
If you get a chance I would love you to check out my newly started blog and follow if you wish
https://clippingpathasia.us/
Hi, You have really made this article so interesting with some fantastic tips. Thousands of thanks for sharing.
Great job. generally it is much tricky to shoot a product photo. Thank you
Thank you so much for explaining all of the camera settings. I have been using an Android phone which doesn’t have a great camera and just ordered a nice Canon camera, but I didn’t understand anything about the settings and what they are used for. I still have a lot to learn, but this is a great start.
I do not have good ideas on photography but able to deliver some outstanding editing. Photographer can get the time efficient services from fotomasking.com. It’s very effective and reliable. Thank you.
Great Post, Thanks for Sharing this useful information
BEST ARTICLE I’VE LEARNT FROM YET!
SIMPLE…
EASY TO UNDERSTAND…..
MOTIVATES TO ACTION.
THANK YOU FOR YOUR VALUABLE TEACHING SKILLS
Appreciate your sharing here.
I do not have good ideas on photography but able to deliver some outstanding editing
There IS a way around the grey background. You just need to learn how to measure the light.
Cameras don’t understand color (They just process it), they understand light. So it tends to underexpose or overexpose to bring it to middle grey. there’s a lot of different techniques to measure properly. some are super easy.
Thanks, Mei for your blog loaded with so much information. Stopping by your blog helped me to get what I was looking for.
This is a great article. Very insightful. Thanks for the post.
Great article! Thanks, and keep up with the good work!
Great and useful technique from background remove from a photo. In this article, all the techniques have describe step by step. So, new user of photoshop can learn a lot of things from this post. I have learned many things from this post. I appreciate this post really.
Margot, I think this a complete guide for product photography. Here you point out all the tricks and techniques very smartly. Thanks for the valuable tips. I have a large high skilled photo
editing team. 50+ photo editor. I want to build a professional relationship.
Its an effective article to take a perfect white background photo. I appreciated your well article. Thank you.
There was a very good article on white-background. Thank you Hope more posts like this
very effective article thanks for sharing.
Ghost Mannequin Effect
If you need Perfect photos on white background you can visit “The Photo Fix” to take background removal service and any kind of photo ediiting service. thanks
Thank you!Your generosity is much appreciated!I’m looking for advice on where to get images of home design, particularly night lights.For jewelry, this is an excellent option. If the thing in question is 10 to 12 inches tall, how will you handle it? What kind of lighting would you use for these? In advance, many thanks!
Thanks a lot for such a great article. this is so useful to me, I am looking forward for many such wonderful article from you.
I have enjoyed reading your blog.
Best Regards,
http://www.Cutoutoffice.com
You’re a good job . i like this blog post. thank you
This is a wonderful article full of resources. You described it very well. Thanks for sharing this with us.
Very informative article. It is so helpful for me.
Wonderful and informative blog.
thank you Mei
I believe it’s fantastic! Thank you for sharing this shot DIY with a light! Finding a place to clamp on the lights will be difficult, but consider pulling over chairs, furniture, or storage bins.
Thank you! Yes, those life shots are important for any and every product, no matter what you sell. have good days.
I think it’s really very working to take a photo on a white background but if any have good knowledge of photography it can possible.
many thanks a good deal this amazing site can be conventional in addition to relaxed.
Really Nice Post, thanks for sharing.
I agree with you that the background should be removed. You can also use a white background for your images to make them stand out more.
I would like to hear your ideas for images of house design, particularly night lights.
https://dinamicostudio.com/service/background-removal
I have read your article. I believe it’s fantastic! Thank you for sharing this shot DIY with a light! Finding a place to clamp on the lights will be difficult, but consider pulling over chairs, furniture, or storage bins. Thank you
Excellent article, a real step by step.
Thank you for sharing.
Success
As a product photography studio, that photographs literally thousands of products on white background — is that don’t get too hung up on making it perfect in camera. Remember, photoshop exists! Somethings are easier and quicker to fix in Photoshop than going around in circles trying to get it right. It’s ok!
As long as you have the basics and standards down, ISO, colour balance ƒ-stop – you’re golden.
I am a photo editor. I do this type of work. reading your blog post i enjoyed. Very informative article. Hope it can be helpful for me. Thank you!
OMG! These tricks and tips are very effective for a new product photographer. Fantastic ideas you have shared here. It will be helpful for a new photograher.
Wow!!! What an amazing information shared here!!! Really liked your suggestions and tips. White background is perfect choice for the product photo shoot but the photography must be better too. Basically I am photo editor and usually I work these type of work often. However, I loved to read this post, thank you again for sharing such amazing and informative post with us.
Best article it is, I really enjoy your post
This is a wonderful article. Very insightful. Thanks for share valuable content.
Amazing
I think this is a complete guide. Thank you so much for your valuable information. You can take photo-editing
services for the white perfect background.
please reply me some good articles about this text as you says jafar-173@
I really love to read the post. It was fantastic. I really enjoyed your post. Thank you for sharing.
I really like to read & post it was awesome. I will enjoy your post thank you for sharing
Product photography is the process of taking pictures of products for use on product packaging, websites, advertisements, and other marketing materials. Product photography can be a complicated and time-consuming process, but it’s an important part of marketing your products.
As I am from a clipping path services provider company, In this tutorial, you share with us another useful technique for us. That will be greatly beneficial for us.
Thanks to author for sharing such a nice article. I love it to read and practice here at Clipp Out Line.
I truly believe that you are an integral part of the product industry, and I am so thankful for the dedication and hard work that you put into each and every photo. And many many thanks to the author for sharing this nice article.
Thank you. For whtie background i use backdrop for my product and i shoot CR3 RAW File later i use camera filter for making it perfect background color. Sometimes i took help from outsourcing company.
Astounding photography. There are just such a variety of still life so on the off chance that you re genuine about computerized photography. Is the aftereffect of computerized photography?
Much obliged for the great picture
Excellent guideline. I’m very happy to read this. I think this guideline given us a straightforward roadmap to perfect product photos on a white background.
Really amazing article. It’s really helpful. Thanks for sharing.
I appreciate you sharing the content. I concur with the criticisms you made about the Photoshop tutorial on making a background transparent. However the problem will become clearer thanks to this blog I have here.
Impression, Attraction plays an important role in an eCommerce Business. Product Photography here an element for achieving the goal. Thank you for shareable your important tips.
Thank you
It’s a wonderful post. It’s very conducive for us. Types of posts have been searching by me. An article about post had been red by me some days ago. But article is better than post.
The important discussion you made about the remove background from image tutorial seems accurate to me. But I have a details blog which will make the matter more clear. Thank you very much for publishing the post.
Great article! Taking great product photos on a white background doesn’t have to be difficult. Having the right equipment and setting up the shot correctly can really help to ensure you get the perfect product shot. Thanks for sharing the tips and tricks for taking perfect product photos! I am also an photographer and Image retoucher . read out my blog about How to edit jewelry image
The important discussion you made about clipping path in photoshop tutorial seems to me to be accurate. But I have a website that will make the matter more clear. Thank you very much for publishing the post.
I’m glad I found yours. The information presented here is comprehensive, and it’s clear that a lot of effort went into compiling it. I actually recently wrote about some best construction estimating software related topics on my blog must check and read them, it will definitely helpful Keep up the great work!
“I stumbled upon your blog and was impressed by your in-depth knowledge on the Product Photography How to take perfect product photos on a white background. Your insights align perfectly with the services provided on my SMA MEP Estimate mechanical estimating services . It’s great to find valuable resources like yours in the online space.”
In my opinion, the most crucial aspect of camera settings for capturing high-quality product photos is understanding ISO, aperture, shutter speed, and white balance. ISO controls brightness and noise, the aperture influences focus and brightness, while shutter speed affects exposure and potential blur. White balance ensures accurate color representation.
Thank you for this..
You explained each topic in very easy manner.
Perfect post to set the white background on the product photo. This post helped me a lot!
Taking perfect product photos on a white background is essential for e-commerce and marketing purposes. To achieve professional looking product you should Set Up Your Studio, Use a White Background, Select the Right Camera and Lens, Set Up Your Product, Tripod Stability, Camera Settings, Use manual focus for precision, White Balance, Fill the Frame and Use a Reflector
You can capture professional-looking product photos with a white background that highlight your products effectively. Remember that practice and experimentation will help you refine your skills over time.
This is interesting information and I will definitely keep it in mind.
It was a serendipitous revelation that brought me to a digital oasis overflowing with stock photos of unparalleled richness and diversity. As I delved deeper into this online repository, I found myself immersed in a visual symphony of landscapes that transported stacked rocks me to far-off realms and portraits that told intricate stories with every glance. The magnitude of this treasure trove was nothing short of breathtaking, opening up a universe of creative possibilities that promises to forever transform the way we approach visual storytelling and design.
Perfect post to set the white background on the product photo. This post helped me a lot!
Perfect post to set the white background on the product photo. This post helped me a lot!
You explained each topic in very easy manner.
You have a lot of good content, don’t hurt your hand.
Did you know that you can watch YouTube without ads and for free on Android TV? To do this, you need to download the Smart Tube APK and install it on Android TV!
Perfect post to set the white background on the product photo. This pPerfect post to set the white background on the product photo. This post helped me a lot!ost helped me a lot!
Very nice blog thank you
Very nice blog
i love your vibe :)
Perfect post to set the white background on the product photo. This post helped me a lot!
its ok and nice. from samira
I love using a white background for my product photos. It’s clean and minimalist, and really makes my products stand out. These tips are super helpful for getting that perfect shot every time. Thanks for sharing!
White is always perfect to use in product photos .
Please checkout my profile and say something about my service
My website
https://mastergraphicsllc.com/
It was useful and good
Of course, it could be the whole semester
دانلود نوحه
Mastering product photography is crucial for boosting your sales. The key lies in the precision of capturing and editing your images. Enhancing them further with subtle shadows against a pristine white background can significantly elevate their appeal. Your insights into product photography are truly valued.
Thank you for sharing your thoughts! Appreciating your content to enrich our digital lives is always nice.
For producing high-quality product shots, I believe that knowing how to adjust the ISO, aperture, shutter speed, and white balance on your camera is the most important thing. Aperture impacts brightness and focus, shutter speed affects exposure and possible blur, and ISO controls brightness and noise. To achieve proper color depiction, use white balance.
I appreciate your work for sharing valuable information. If you’re in need of top-notch moving services, you should definitely consider Electrical Estimator Expenses
Thank you for this useful article.
Hi Thank you for this useful article.
I enjoyed reading your interesting post! Thanks for sharing I’m excited to share more with you. If you ever want to know how much it costs to hire an electrical estimator.
Useful information. Fortunate me I found your website accidentally, and I’m shocked why this coincidence did not took place earlier! I bookmarked it.
thanks its really nice post
its really helpfull
Helpful article. To take perfect product photos on a white background, it is better to remove background using AI or and change it.
For more insights on advanced AI tools and innovations, visit AIConvert on PitchWall.
It is good also go generate photos using the
top AI photo generators and then removing the background like you mentioned in the article.
Writing prompts
is considered a good practice to generate a good quality photos that can helps us in our branding
Taking perfect product photos on a white background involves careful planning and execution to ensure the product is the focal point and the background is clean and pure.
Interesting insights shared in the discussion about the latest AI tools. For those looking to dive deeper into artificial intelligence topics, the AI Land
profile offers a range of articles and discussions. It’s a valuable resource for anyone interested in the advancements and applications of AI.
Thanks for sharing your view.
hi
NML
It was great. Thank you and your good site
wow good article keep posting
https://mydesert.ae
About Us at WhiteScreen.io
Welcome to WhiteScreen.io, your reliable resource for free screen testing across all devices. Our easy-to-use platform offers a variety of color screens, including white, to help you detect imperfections and calibrate your devices. Whether you’re checking for dead pixels, scratches, or color accuracy, our tools are designed to ensure your screens are in perfect condition. Visit us today and experience the simplicity of maintaining optimal screen performance with no cost involved.
A “white screen” in the context of web development and software applications typically refers to a situation where the user is presented with a completely blank, white display instead of the expected content or interface. This is often an unintended error state. Here’s more information about white screens:
hey guys,
If you need a white screen, white background or other colors, you can use it.
http://www.screenhue.com
Thank you for sharing your thoughts! Appreciating your content to enrich our digital lives is always good.
Hi! It’s a great blog. Thanks for this productive content. I will be waiting for more of your posts.
https://prophotoshopexpert.com/affordable-clipping-path-service/
Thank you!
We are working with many clients outside the country but you are not with us, we are an international photo editing company you can try working with us once.
https://pixelephotoeditinglab.com/
Pixel Photo Editing Lab is a quality full service photo editing studio. If you want to get your images edited by a skilled designer, contact us. We are providing photo editing services at low cost. We are working with many clients abroad who are very satisfied with our work
Great tips for getting perfect white backgrounds! I’m always looking for ways to improve my photography. If you’re interested in exploring AI-powered tools for image editing and enhancement, check out this resource: AI Factimg Links
Great tips! It’s helpful for those of us trying to elevate our product photography without breaking the bank. But i found CGI the most effective at low value: https://wepix.com/
Thank you for great suggestions. I haven’t been able to get GIMP to work on MAC. There are some AI photo editors out there but I haven’t found one that’s completely free to use to whiten those grey backgrounds. Do you know of any?
Also, I’m getting a little light reflection in the back of my photos on the “non-reflective” fabric that came with my light box. Any suggestions there?
Use white screen, many white screens and take your perfect white on background
I love how straightforward this post is! The step-by-step instructions on setting up the perfect white background are so easy to follow. I especially appreciate the suggestion about using a reflector to fill in shadows—it’s something I hadn’t thought of before!
This is exactly what I needed! I’ve been trying to get that professional, crisp white background for my Etsy store, but I could never get the lighting right. Your guide on using multiple light sources and the DIY setup for a seamless background will definitely help!
This post is exactly what I needed! I’ve been struggling to get clean, professional-looking product photos for my online store, especially with white backgrounds. Your tips on lighting and using a seamless backdrop are super helpful—I never realized how much the right lighting setup can make such a big difference! I’m definitely going to follow your advice on using diffused light and adjusting the camera settings for a sharper image. Thanks for breaking it down so clearly; I’m excited to try these techniques out!
Great tips on achieving clean, professional photos with a white background! Lighting and composition really make a difference when trying to get that crisp, seamless look. I especially love the advice on avoiding shadows and using editing tools to perfect the final image. This is a must-read for anyone in e-commerce or product photography. Thanks for sharing such practical and valuable insights!
Twitter Advanced Search is a powerful tool designed to help users find tweets more accurately and efficiently. Please visit our website to experienceTwitter Advanced Search
Thank you!
Elva
I am happy to visit your blog.keep updates more valuable information.Thank you. If you need a clipping path service for your online shop, Graphic Experts India will help you to grow up your business by providing high-quality image.
great
MP3 Cut Online – Audio Cutter
Trim or cut any audio file online. Free online tool to MP3 Cut files, trim audio, create ringtones, and more. No registration required. Fast and easy to use.
I have greatly benefited from your blog. Your writing is very nice. Your writing is very effective. Keep it up.
Lovely tips. That was really so amazing the method.
Thank you for share us. This is part of digital Business .
I am the Chief Executive, SEO & DTP Expert of Clipping Path Specialist, who create online digital images for the global client.
As a photo processing company based out of UK,
Really appreciate these detailed tips for achieving perfect white background photos! It’s a skill that’s always in demand for clean product presentation.
It’s interesting how the core principles of good lighting and distraction-free presentation are so universal across creative fields. Even when working with digital materials and 3D assets, like some artists in the Substance 3D community, the goal is often to showcase the work with clarity and professionalism. The focus on how the subject interacts with light is key everywhere.
Thanks for sharing such a comprehensive guide!
I am constantly floored at how generous you are with your information and tips! You never tease with partial information just to get people to pay to get the rest. Thank you for what you do and how you do it – THIS may be the top reason why you are so successful! 😇
Thank you for your article.
Thanks for sharing such a comprehensive informative!
Thank you for share us.
as part of you says your idea can save world as soon samira-210@
thanks friend i read this page exatly to understand you samira-210@
This is such a helpful guide! I’ve been struggling with getting clean white backgrounds for my product photos. Love the DIY lightbox setup with clamp lights – so much more affordable than buying expensive equipment. The tip about editing afterwards is key too – I always wondered why my backgrounds looked grey instead of pure white. Can’t wait to try this setup!
Discover stylish Dress for boys. Perfect for any celebration. Shop our trendy and elegant collection now! Dresses for Boys
NeuroPrime is an advanced cognitive supplement formulated to boost memory, focus, and mental clarity using a carefully selected blend of natural ingredients. Designed with a holistic approach to brain health, NeuroPrime supports enhanced cognitive performance and promotes overall mental well-being.
ProstaVive is a one-of-a-kind formula packed with natural, blood-boosting nutrients that not only support prostate health but also enhance the circulatory system and sexual well-being.
Progenifix is a dietary supplement designed to help individuals achieve their weight loss goals while supporting overall health and wellness. This innovative formula combines natural, science-backed ingredients to boost metabolism, reduce appetite, and promote a healthier body.
PowerBite is the only dental supplement that supports teeth and gum health with its unique blend of minerals, conveniently packaged as a simple dental candy. Each piece is carefully crafted with a selection of natural ingredients and minerals to enhance your oral care routine.
RenewRitual is an advanced serum designed to promotes balance within your skin’s natural microbiome, fostering healthier, more resilient skin
I am constantly floored at how generous you are with your information and tips! You never tease with partial information just to get people to pay to get the rest. Thank you for what you do and how you do it – THIS may be the top reason why you are so successful! 😇
I am constantly floored at how generous you are with your information and tips! You never tease with partial information just to get people to pay to get the rest. Thank you for what you do and how you do it – THIS may be the top reason why you are so successful! Photo Background Remove (PBR)
This article is a great resource for Triumph TR3 A enthusiasts! When working on classic car projects, accurate planning and budgeting are essential to ensure a smooth restoration process. Blaze Estimating provides reliable cost estimation solutions that help you forecast expenses with precision, making your restoration journey more efficient and stress-free.
Excellent post! I always thought perfect white backgrounds required expensive studio gear, but your tips proved otherwise. With just simple tools and proper setup, my product images now look like they were done professionally. Highly recommended!
However, if any query about photo editing just reach out Cutout Partner.
https://cutoutpartner.com
Super helpful post! White backgrounds can be tricky, but your explanations make it so much easier. I especially liked the tips on using natural light and simple backdrops for a clean look. The examples showing before-and-after shots really illustrate how proper lighting and angles improve the final image. I feel motivated to improve my product photography setup and create images that look professional for online platforms. Your guide is practical and easy to follow, making it perfect for beginners and small business owners alike.
Need any types of image editing services 24/7 Just contact Us: https://cutoutpartner.com/ecommerce-photo-editing/
SynaBoost is a premium dietary supplement formulated to enhance brain function and support overall cognitive well-being.
Blending time-tested traditional remedies with the latest advancements in neuroscience, this innovative formula fits seamlessly into your daily routine. It offers a natural solution to sharpen mental clarity, boost memory, and maintain long-term brain health.
Housemaid services in dubai
NeuroPrime is an advanced cognitive supplement formulated to boost memory, focus, and mental clarity using a carefully selected blend of natural ingredients.
This guide is super helpful — the tips on lighting and camera setup make getting clean white background shots feel much more achievable. I especially liked how you explained the balance between exposure and background brightness. The before/after comparison really shows how much of a difference the right setup can make. Thanks for sharing these practical steps!
If anyone wants to take their product or white background photos even further with professional finishing touches, check out this
Photo Background Removal Services
page from Retouching Zone
Nice Post.. Thanks!
Macbook Repair
Great article — really appreciate how clearly you explained the importance of lighting, consistency, and clean white backgrounds in product photography. The breakdown of setup and camera settings is especially useful for beginners trying to get professional-looking results.
One thing I’ve noticed from working with eCommerce brands is that even with a good setup, achieving a perfectly clean background and edge refinement often still needs professional post-processing. That’s where background removal and retouching really makes a difference in maintaining a consistent, marketplace-ready look.
We actually provide professional background removal services here : Background Removal
for product images, helping brands get clean, distraction-free visuals that are ready for Amazon, Shopify, and other platforms.
Great guide! The breakdown of lighting setup and the importance of a clean white background is really helpful. Consistency and proper editing truly make a big difference in product photography. Thanks for sharing these practical tips!
Great guide! The breakdown of lighting setup and the importance of a clean white background is really helpful. Consistency and proper editing truly make a big difference in product photography. Thanks for sharing these practical tips! please visit this side : https://clippingobject.com/